Tuesday 26 April 2011

Seaside greetings


A short seaside greeting from the Modern Country Gentleman, Maud, and Millie and myself .
 The southwest coast of the United Kingdom is bathed in sunshine which makes for a very pleasant and enjoyable time.
 The area here is full of lovely old harbour towns with quaint old houses with lovely architectural details ..

and the town gardens were really a pleasure to wander through with everything in bloom..
                                          
There are lovely coves to explore..
so all I can say is.. wish you were here ...;-)


Saturday 23 April 2011

Happy Easter


The Modern Country gentleman and myself , Millie and Maud are wishing you a very happy, relaxing and fantastic Easter time.

We are exploring the wonderful Devon coast and countryside- below the Angelique tulips in the cottage we are staying..
                                 some wonderful black tulips..


                                     and some glorious camelia's..


and the view from the windows shows you this is a real gardener's paradise.


Hope you are having as lovely and relaxing a time as we are having here.
Happy Easter!!

I am linking this to  Seasonal Sunday
                                Metamorphosis Monday
                                 Brag Monday
                                 Making the world cuter Monday
                                  Craft catwalk
                                Tuesday Garden Party
                                Table top Tuesday
                               wow us Wednesdays
                              Wassup Wednesdays
                              transformations and treasures
                              Tablescape Thursday
                                
                                Favourite destinations

Friday 22 April 2011

More Easter preparations


Today more Easter preparations- the Simnel cake or Easter cake .
It's almost a shame to be indoors , baking away, as the weather has been so glorious here.
It's the first time I have had the lilac and the bluebells in flower at the same time ! I am so enjoying this Spring!
The lilac embroidered cushions, by the way, are the ones I made in this post .
But it's very nice to have your own Easter cake and it's pretty simple- and it makes Easter so much more festive.There is no comparison to a shop-bought one !


Here are your ingredients for your
Easter cake or Simnel cake

100 gr glacee cherries350 gr dried mixed fruit
175 gr butter
175 gr sugar
250 gr flour
1 teaspoon baking powder
1 teaspoon cinamon
25 gr ground almonds
3 eggs

2 packs of marzipan each 400 gr
yellow food colouring
red food colouring
3 tablespoons apricot jam.

A round cake tin, diameter about 23 centimeter

A ruffled cake " collar" ( you can buy them in cookshops).
A nicely coloured ribbon.

 How to make your cake:
Preheat the oven( 170 degrees Centigrade ) .


Cream the butter and sugar till light pale yellow.
Mix the flour, baking powder, cinnamon and ground almonds in another bowl.
Add an egg to the butter mixture, then add some of the flour mixture, then put in the next egg, then some more of the flour mixture, till you have added all the eggs and all the flour.Then add all the rest : the cherries and the dried fruit.Mix well.
Take your round cake tin and line it with baking paper.Spoon half of the dough in the caketin.
Roll out the marzipan and cut a circle of about the same diameter as your round cake tin and put this on the  dough in the tin.
Spoon the rest of the dough in the tin on top of the marzipan.The marzipan is thus in the middle- and it will be really nice when you have a slice of this cake as it will be fruit-cake- marzipan- fruitcake.
Put the tin in the oven and bake for 30 minutes, then turn the oven down to 150 degrees Centigrade, and bake the cake for another hour - to and hour and a half or so. Just check if it's done- the top needs to be firm , and I always put a knitting needle in - this should come out clean and dry.

Take the second pack of marzipan and split it in two.
Mix 1 half with a bit of yellow food colouring, and mix it through properly so it is an even soft yellow all over.
Put the apricot jam and warm it up so it becomes a bit thinner, then paint the top of the cake with the apricot jam.
Roll the pale yellow maripan into a second circle , as big as the diameter of the cake- and put this on the top of the cake.
Mix the second half of the marzipan with a bit of yellow and red food colouring, and mix it through properly so it is an even soft peachy-orange.

Make11 equally big balls by rolling little globs of marzipan between the palms of your hand, and set them around the edge of the cake as you can see in the picture here above.

If you are a really good and skilled baker and icing is not a problem for you, you can write in freehand with icing on the cake, and write " Happy Easter" or "Simnel" or some Easter greeting.
I got the icing very neat by getting a nice font from my pc, and enlarging this, then used this as an example to cut a stencel for the letters " Simnel".
I piped green icing throught the stencel and in this way got really precise letters.Just a thought!
Then you can make your cake even prettier by putting a cake collar and around the collar , a pretty ribbon- and you are done- ready for Easter !

So - happy baking! Have a lovely and relaxing time on your break...with hopefully some lovely weather, sunshine and lots of flowers..
                                                                                      

                                                              and a very happy Easter!
                                                                        ...................
                                                             Also from Maud and Millie.
   
                                                      Here they are playing and laughing.
                                                              Have a great time !!                            
                             
I am linking this to  Swing into Spring Wednesday
                              Transformations and treasures
                             Transformation Thursday
                             Time travel Thursday
                            Feathered Nest friday
                            Full plate Thursday
                            Beyond the picket fence link party
                            Inspiration Friday
                            Foodie friday
                            weekend wrapup party
                             Feature yourself friday
                             Smile with me Saturdays
                              Seasonal Sunday
                              Metamorphosis Monday
                             brag Monday
                             Making the world cuter Monday
                             Craft Catwalk
                             hello Splendor link party
                             show off your cottage Monday
                             Take a look Tuesday
                             Tutorial Tuesday
                             Table top Tuesday
                             Get your craft on
                               Tuesdays treasures
                              Nifty Thrifty Tuesdays
                             wow us Wednesdays
                             wassup Wednesdays
                             show and tell wednesday
                            transformation Thursday
                            Thrifty Thursday
                            tablescape Thursday 
                            time travel Thursday

Sunday 17 April 2011

Easter preparations


I can't believe how fast the time has gone- it's almost  Easter!
Hope your Easter preparations are going well according to schedule- in which case you may want to try out these two recipes which I love- you may just have the time: hot cross buns 


                                            and Simnel cake.
                                                        
Before I came to live in England, I had never heard of hot cross buns- but I have really grown to love these little buns with dried fruit and cinnamon and orange zest .They are really  
 tasty and quite fun to make- and absolutely delicious straight out of the oven with some fresh butter.
And Simnel cake, basically a fruit cake with marzipan, is very festive and yummy and gets you really into the Easter spirit with a nice cup of tea.
I will give you the Easter buns first and the Simnel cake recipe later in the week.
Here are the is the recipe for
Hot cross buns.


This is an overnight recipe so the dough can rise- so remember to start the evening before!!
Ingredients:
150 ml milk
2 eggs
50 gr butter
400 gr  white flour
yeast : 2 x packet of dried yeast ( = 2 x 7 gr= 14 gr)
125 g mixed dried fruit
1 clove
grated zest of 1 orange
1 tsp cinnamon
1 tsp nutmeg
1/2 tsp ginger powder
2 cardamom pods


Preparation :
Put the flour, yeast and dried fruit with the spices in a bowl.
Warm the milk with the butter, zest , clove and cardamom, melt the butter in the milk, then leave to let the flavours get into the milk.
Let milk cool till luke warm, then take the cardamom pods out. Beat in the egg, then add the whole of the milk and egg mixture to your flour mixture.Knead through till you have a nice elastic dough.This is best done by hand, as you can feel the dough change.Form into a ball then put in a covered bowl in the fridge overnight.
The next day, take out the dough out of the fridge and let it warm up- I usually use my airing cupboard- you need a warm-ish place with no draughts.The warming up will take at least 30 minutes.
Pre-heat the oven to 220 degrees Centigrade .
Knead the dough again til it feels smooth and elastic.Then spilt it into 16 ball, which you roll between the balls of your hands.Take an oven dish and line or butter it ,and put the litle balls on it. Cut a cross with an kitchen knife in the top of each ball.Cover  the oven dish with a clean tea towel, then let it rise for 2 hours.

Take 1 egg and beat this into a small bowl, then cover the buns with the egg-wash on the top.
Take 3 tablespoons of flour , 1/2 tablespoon od sugar and dissolve this into 2 tablespoons of water, so you have a thick white paste.Use the end of a teaspooon to dribble this white paste as a white cross on top of the buns.
 Bake in the pre-heated oven for 15 minutes.


Mix 1 tablespoon of sugar and 1 tablespoon of hot boiling water, and brush each bun withthe sticky mixture so the buns are all shiny, then ..
try not to eat them all at once !!

Happy baking !!


I am linking this to
Seasonal Sundays
Pink Sundays
The Sunday Showcase
Weekend wrapup party
Metamorphosis Monday
Masterpiece Monday
Brag Monday
Making the world cuter Monday
Amaze me Monday
Craftomaniac Monday
Table top Tuesday
Tuesdays Treasures
Nifty Thrifty Tuesdays
Take a look Tuesdays
Twice owned Tuesdays
get your craft on
Wow us Wednesdays 

Friday 15 April 2011

Another feature and a Spring weekend greeting

This week has been very quiet for me as I not only got the flue  so I was bed-bound , but I also could not get any updates on any of you lovely people as I found my modem completely dead ! (I send this short blogpost courtesy of Modern Country Gentleman's dad's internet access ).


Hopefully next week will be a better week where I will be able to work on my projects and be fully recovered..


In the menatime I leave you with some Spring time cheer, and some news of another feature-

The fabulous Rebecca Restrepo has done another feature on www.examiner.com about Modern Country Lady !! Entitled"Get ready for Spring with simple Home projects."

She is featuring and linking to my Rustic wreath blogpost,Moss topiary and Easter wreath with moveable bunnies

Go and check it out if you want !!
The link is here

  Have a good weekend!

I am linking this to Tuesday Garden Party

Sunday 10 April 2011

A flowering, blossoming Spring wreath

The beautiful weather we have had the last few days has made the trees all of a sudden  burst into blossom, and all the spring bulbs open up- which is just so lovely.Last week everything was still in bud, but now, my flowering cherry looks like it is covered in pink snow.


It was the first time for Thomasina to climb into a tree, and sure enough, she determinedly climbed all the way to the top...

                               then worked her way up to the thinnest and highest branch..                                                                      
    and then let out a tiny complaintive cry as she could not think how to get down.A classical cat caper  !
It was also the first time I did the lawn this year, and the overloaded branches of the cherry tree swept all the way to the ground, which was quite pretty..

  but also quite impractical as I could not get through very well with the mower.
 So I thought to do the tiniest bit of pruning and get a nice decoration for the home at the same time and make a flowering cherry wreath.You might as well enjoy the spring and the blossoms as it is such a short time!
You could do the same with any flowering tree at the moment that you want to give a bit of a trim, as everything is in flower right now.
Make a basic wreath - how to do this you can see in this post  ( Just seek out some willows...they grow very fast and will have lots of branches..tie some branches together with twine , then form it into a circle , and attach the two ends by overlapping and then also securing with twine)
 This will give you a wreath like this :
      
Get some branches off a flowering or blossoming tree- in my case the flowering cherry.
                                                  Attach to the wreath, add ribbon- done!
                                                          Use on your front door...

                                                              and here is a detail
                                                                         
                                                           Here is a the door in full..

                                                                Or hang it indoors...

                            A 5 minute job all-in all- super simple and quick - so give it a go!!
                                                       Just the thing to brighten up your day!
                                                                  Happy spring- enjoy!             

Friday 8 April 2011

A different Easter egg decoration


Today I wanted to show you how to achieve a different Easter egg decoration which is super- simple, striking and great fun to do.You can use these decorated eggs for wreaths, in bowls scattered around the house and in table displays for that extra festive Easter feel .


If you want a white background to start with, I recommend duck’s eggs- plus they are really gorgeous to eat. You will have quite a bit of egg-yolks and whites  to eat afterwards, once the decorations are done. So think cakes,omelettes,  meringues and quiches .So duck’s eggs it is. This is your starting point.


We are now going to empty the eggs of the egg-white and egg-yolk, so you can keep them forever after you have decorated them- they can’t get stinky if they are empty.A rotten egg can smell pretty badly, and you don’t want that, especially not if you have decorated them very prettily.
                                     This is your tool to empty the eggs.A big darning needle.

 . 
Make a small hole at the top and the bottom of the egg.This is the size of hole you are looking for.
                        
                                                      
Put a bowl under the egg and blow with your mouth covering the hole at the top,pursing your lips with a concentrated blow as though you are playing a trumpet....
and blow out the egg out. The egg white will usually start first to will slowly dribble out of the other small hole.
                                                              
                                    The egg yolk usually follows and then the whole egg pops out.
 
Clean your egg ( otherwise the paint won’t stick ) –remember, it is just an egg shell it is so quite fragile- so handle it carefully while you  give it a wash under the tap- and dry it.
You are now ready to decorate.
There are hundreds of ways to decorate eggs, but I thought to show you just a few that are fun and easy.
One is super  simple and quick and quite quirky.
This is how you start. Get some string from a hardware store.Here is your empty egg and string.
Get a glue stick and run the string over the glue so it’s sticky, then wind it in a random pattern over the egg. Make sure there is enough glue on the string and keep on running the string over the glue stick.Your string needs to have glue on it all the way so it sticks.
Keep on covering the egg till you like the pattern then stop and cut off the remainder of the string.This is what you will get.I almost liked it enough to keep it this way !

       A completely pointless and pretty present for Easter: and empty egg wound with string !!Hahahaha!
If you want more than you go to the next stage.Get a nice bold colour and start painting the egg.
 To be  able to paint the egg all over, so that you do not have to hold it, and get finger marks all over it,  you can  take a wooden skewer which you can get in a kitchen shop or supermarket, normally used for barbecueing, and skewer the egg on it, sticking the skewer in through the bottom hole you made, and fixing it in the top hole in the egg.
Paint the egg all over, turning it on the skewer, than fix the skewer while the paint dries in a surface that will support the skewer and egg. I could not think of anything clever so put it in a big candle.
Here I have done this with eggs I painted a duck egg blue.
                                     You get no marks on the egg this way and it can dry all over.
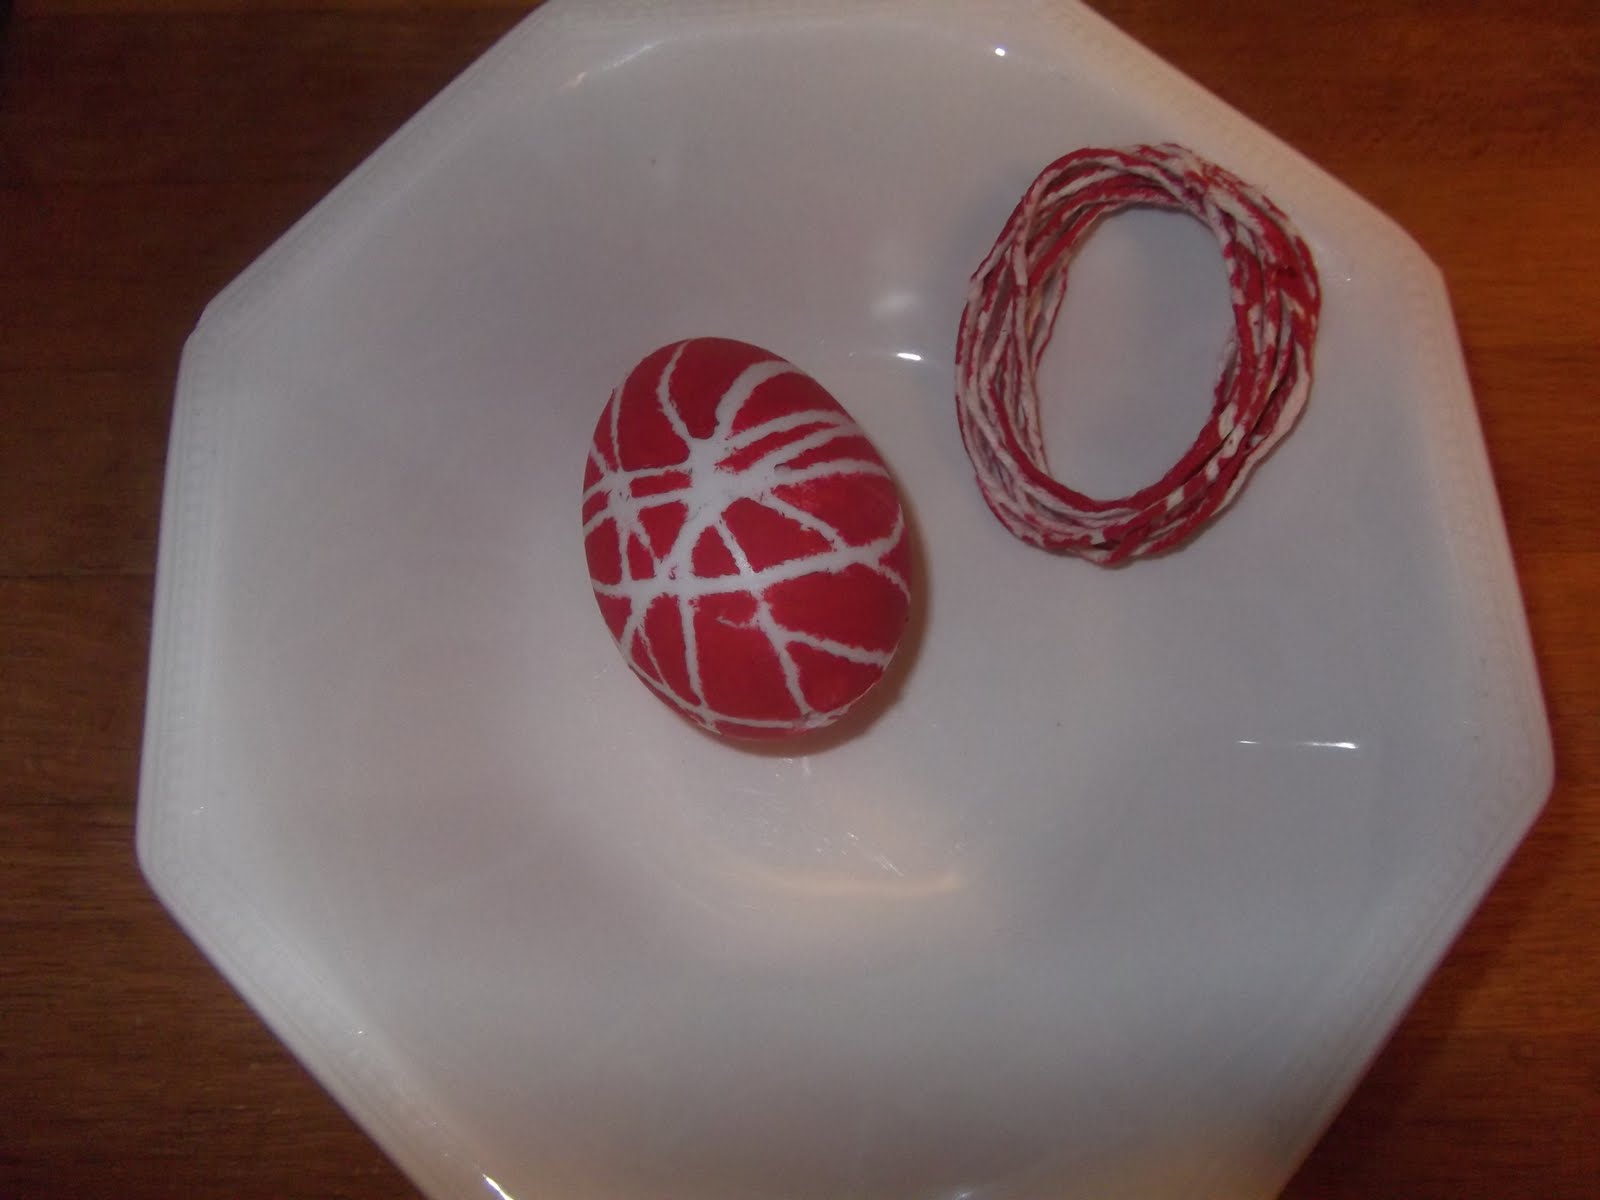
    A bold colour like bright red, blue or green works better than pastel- colours with this technique, , as there is a greater contrast between the colours and the white of the lines  , which is the white of the egg-shell.Let the paint dry, then remove the string.
                                                                  
 Do the same thing with a few more eggs, and paint all of them nice bright colours, then display in a nice bowl or self-made bird’s nest, or on an Easter wreath.
                                                        Happy crafting and happy Easter!!