Monday, 29 August 2011

A very English village affair- and two prizes !

There is something absolutely irresistable, and very Miss Marple , about the English village fete, or indeed the English "Village Produce and Flower Show " at the end of each summer.  There is something very silly but also very life-affirming about getting very worked up about who makes the best jam , or who bakes the best cake and competitions for " Best Onion" or " Best Bunch of Garden Flowers " or " Dog most looking like it's owner".Try as you may, you can resist, but eventually you fall for the charms.I guess old age or reading too many " Agatha Christie" novels just gets you in the end!

This weekend it was time for the "Village Produce and Flower Show " in the village I live in.
This was my entry for the category " Houseplants".*Snort*.Yes, I know ...It is one of the begonia's in the pots and the makeover project I did here.
And I am very thrilled to say, I actually got first prize- and here is the certificate...This with a begonia, my least favourite plant of all, possibly ..o..well..

This was my entry for the category " needlepoint ".It is one of a series of cushions I am working on .


And again- believe it or not -  I got first prize- and here is the certificate...the bobble fringe did not go in properly but they seemed not to have noticed ..shh!!

 
A village fete or produce show is not just fun  for humans, but also for dogs and their besotted owners.
I think the English do dog-love very well  and there is always a huge crowd of happy and and gorgeous looking dogs, all competing for incredible silly categories, all to the great delight of everyone present.There are a lot of "hey, hello, there"'s ..not just from the owners but even more so from the dogs themselves.

It's just great to see all these dogs socialise, and there are nothing but waggy tails and legs and paws...

.

This sweet little tan coloured terrier is the first prize winner in the categorie " Best dog with junior handler" but a few years ago it won the prize " Dog looking most like it's owner "..( and it is true- it does ! )
This wire-haired dachshund won in the category " Dog with the waggiest tail"- her owner later told me the trick to keep her wagging her tail, was , to keep on showing her her favourite tennisball !
And this little pooch won " dog most like it's owner " this year- and it was absolutely true, the gentleman who who owned her( or him )  looked just like him/ her!

This happy jack russell and the tan terrier are both owned by the same lovely lady- look at the happy faces!
Amd this lovely looking labrador quite rightly won "top dog all around".

Here are some more winners in the vegetable and flower categories:
" Best flowers"..
And "best basket of vegetables "- who would not want this as a present !!
As I sit here with Maud on my knee (who did not win " best dog" but is "best dog" for me anyway) I look back on a fabulously enjoyable day with not just one- but two first prizes....well..what more can one want!
Shame my little jug with " Bunch of garden herbs " did not win- but you can't have it all!!

Have a great week!
XOXO
Bea

linking to
craft-o-maniac monday
show off your cottage monday
making the world cuter monday
Brag Monday
Metamorphosis Monday
My favourite things link party


.


Thursday, 18 August 2011

Green walnut liqueur

If you have never had green walnut liqueur before, you have a treat coming.
This is a delicious and unforgettable drink-and a French recipe so it's absolutely terrific. It's still early enough to pick green walnuts- but you have to hurry!
The recipe is a piece of cake- just putting all the ingredients together .Then .. wait.. and that is the only hard part!!
First you need to be able to get hold of some green walnuts- if you are lucky, from your own tree, or from your greengrocer, or , foraging in the countryside .
This is what the leaf, the outside of a green walnut, and the inside of a green walnut looks like, next to a brown walnut.
First , pick yourself a platter full of green walnuts.You will need 30 or so for this recipe.Of course,  you can double the amount if you double all the ingredients.
The ingredients are:
25 to 30 green walnuts
3/4 liter brandy
600 g sugar
1 cinnamon stick
3 gloves
the zest of 1 lemon
First, get a clean and sterile jar- medium size.Sterilize by running it through the dishwasher cycle and use it while it is still hot( or wash it with boiling water).


Then wash your green walnuts.
Then , put some household gloves on, as the green walnuts stain your hands terribly, and a big knife and cut the green walnuts in quarters,You may have to give the knife quite a whack to get the walnuts cut so do be careful. Better no walnuts and no walnut liqueur then no fingers!

Place all the ingredients, ( apart from the green walnut quarters) -so the brandy, sugar, cinnamon, gloves and lemon zest, in a big bowl with a pouring spout .
Mix the brandy and sugar so it more or less dissolves.This may be quite heavy going.Then put the green walnut quarters in as well.
Mix and pour in your jar.

And you're done!For a pretty label for your pot,you can download   from The Wedding Style Blog  for free
I used this , called " Pretty Parisian"
Print it off, stick it on your jar , write date and what kind of liqueur it is , and you're done !
Leave the pot for at least a month, and stir from time to time.
Then pour through some muslin or coffee-filters into bottles and leave for 6 weeks.
Just in time for a festive aperitif for Christmas!!
(You can also leave it for a year or longer but you may find this hard to do.....  )
Enjoy your liqueur!
Have a great rest of the week!
XOXO
Bea

P.S.
If you have no access to green walnuts, but only to pecan nuts, you could try the recipe below which is very similar to the green walnut liqeur recipe as far as ingredients are concerned!

1 cup brown sugar
1/2 cup water
750ml good brandy
1 cup lightly chopped and well toasted pecans
1 1/2tsp vanilla
1/4tsp cinnamon

Heat sugar and water until sugar is dissolved and let cool. Add all other ingredients and let seep for 6weeks then strain into appropriate container. 

P.P.S.

I must let you know, there is also another green walnut liqueur recipe on a fabulous foodblog I just discovered.
This is written by David Lebovitz , a chef who lives in Paris and worked or works at Chez Panisse.
This is the blog : http://www.davidlebovitz.com/
David uses wodka instead of brandy, and the ratio wodka to walnuts is different plus he has some other ingredients.It sounds delicious too!Of course, for those withoput walnuts, again, I would recommend trying the roasted pecan nuts!  The recipe can be found here .
So of course, today, I have made his recipe as well, and I am going to see which liqueur I like best in a couple of weeks time!
Have a go and if you want, check out David's blog !
XOXO


An English Fairytale

Don't you just love an idyllic wedding ? A fairy-tale wedding is very hard work underneath it all but when it  comes together, there is nothing quite like it....
One of my very bestest of friends, S., a completely wonderful person all around, has raised two beautiful, gifted and  absolutely lovely daughters with her darling husband,  - and the eldest daughter was married  to her dashing sweetheart last weekend........so there was a lot of hard work that had been done before-hand, but it was so worth it..
The church wedding took place in one of those ancient churches which are dotted around in the English country side, inside all oak beams and lovely architectural detail .
The flowers in the church were all white and beautifully done .

The bride had gone for a lovely classic outfit : tulle over white  - a full lenght dress.

The dress had a sweetheart neck-line , and this was worn with a simple string of pearls , and the hair in an up-do , with white roses.

And here is the up-do of the hair, afterwards, without the veil.

The wedding bouquet consisted of white roses, stephanotis and berries with greenery .

Here is the happy couple leaving church..
( It was a private wedding and we don't want to intrude too much- so there will be a lack of faces- but they looked very happy. )
They left church, while the bells were ringing out...and they and all the other guests passed through the Guard of Honour outside the church....
Then it was off to the reception. Here is the mother of the bride, who looked stunning and elegant in an amazing hat and outfit.
Here is the sister of the bride in her silk grey bridesmaid's dress .. so elegant!
And here is the bridesmaid's bouquet..


The recpetion was again in an idyllic location.
Decorations like bunting, and flowers/ hearts with initials were all self made by the bride , the bride's sister and her mother!!
So talented!
Here is some more of the decorations..again made by the bride, her sister and their mother.
And the wedding cake was something else altogether.The bride is so talented and made this herself !!
This is the top of the cake..
And here is an overview of the wedding cake ..so adorable with the bunting...and very clever, as there were three layers, and three different sort of cakes, not just fruit-cake, but sponge cake, and another diffferent cake as well- so guestst who did not like fruit cake, had a choice of a different cake !


And here is a detail of the side of the cake.

What a fabulous wedding- and cake, decorations and bunting all home- made!
It just shows if you are talented , creative and hard-working , you can create your own dream wedding ( with a little help from your friends.... ). The reception couldn't have been done at all had it not been for the incredible generosity of a friend who lent the bride and groom his house and garden.. hence the idyllic location!
We, the Modern Country Gentleman and I , have certainly enjoyed it immensely and have felt very privileged to be present.. .
 I hope you join me in wishing this lovely young couple a very happy life together.


Have a lovely rest of the week!
XOXO
Bea
P.S.
Wedding-cake -enquiries can be directed here : alexandralawrence@hotmail.co.uk
Wedding decorations and bunting- enquiries can be directed here: alexandjameswedding@hotmail.co.uk  


Thursday, 11 August 2011

Prettify & re-use your gift bags

Here is a quick way to recycle and re-use your old gift bags.It will be so pretty you wonder why you bother buying new ones!
It's super simple- and at practically no cost- so give it a go !
First, go on " Google" , then on " Google Images " , then put in " Victorian Scraps" and get some copyright - free images that you like and print them off.
And here is a detail of what you may get :


Then get yourself an old gift-bag ( ideally plain coloured).
( Ooops-I had already started with the make-over here and have no other picture! ) .

Then, use your Victorian scraps to either cover up brand names or damaged bits on the bag.
The next step is to thread some gingham ribbons through for the handles to give it a bit of a rustic feel.
Take the old string out, push the ribbon through, and make a couple of knots on top of each other at the back.

Here is an overview with the bag now " repaired " with Victorian scraps and with the new handles.


Now for a gift inside.For a simple "Thank you " gift, you may want to give a home-made pot of jam, maybe.
You can find a recipe how to make that here.

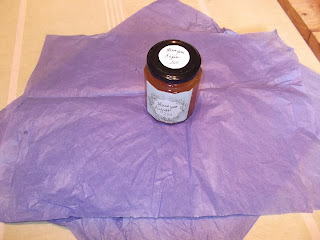
Here is how you wrap it up in tissue paper:
Take two pieces of rectangular tissue paper and place these in more or less straight angles on top of each other.Put your present or jam pot in the middle.

Fold your hands round the tissue paper and pot..
..and tie it at the rim of the pot with some simple string.
Fold some more tissue paper of the same  or a contrasting colour into the giftbag and put the present inside.
Put a nice card inside as well with a greeting, thank you, or congratulations.

Now for some more pretty stuff for your giftbag.
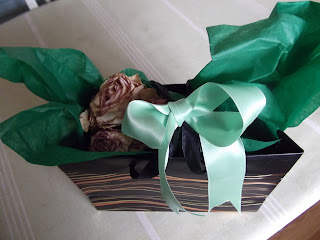
I recommend always drying the flowers and flower bouquets  you get.Don't throw them away! Once they are really starting to droop, just tie them together with string, and hang them upside down to dry from the ceiling or a hook or nail. Roses usually respond well to this treatment.
Shorten the stems of your dried flowers slightly, then put them on top of the present in the bag and drape the tissue paper around it.
Make a nice bow with some more gingham ribbon around the roses.

And you're done!
Piece of cake ! Happy crafting!!
Enjoy the rest of your week!
XOXO
Bea

P.S.
This works with different coloured bags & ribbons as well... as seen here below..
( had some trouble with cat-stalkers ..)
so difficult to get a good shot..
extraordinary"helpful"....

so best to show the bag from another angle...
Hopefully you get the gist of it..!!

linking to
Wow us wednesday
Tablescape Thursday
Transformation Thursday
Thrifty Thursday bloghop
Thursdays Blog Linky Part at Somewhat Simple
Inspiration Friday
Frugal Friday
fridays unfolded
tabletop Tuesday
Wow us wednesdays