Friday, 27 May 2011

Elderflower cordial deliciousness for your weekend or garden party

If you have never made your own elderflower cordial, this is the perfect time of year to give it a go and make this deliciously fragrant and exquisite drink- perfect for your weekend or garden party.
Cordial is a syrup-y drink you can dilute with water , fizzy wine or - even better- champagne - and elderflower cordial is one of the best - plus super easy and gorgeously fabuloso to make yourself!

The elder tree thrives practically everywhere and completely boring to look at during most of the year-apart from early summer.
It then covers itself completely with big heads of delicate lacey flowers that have a lovely and tangy scent.
                                                                      Here is a detail.
  To make this lovely drink with some fizz -whether alcoholic or just fizzy water- so you can celebrate the weekend with your friends,you will need the following:

Ingredients:

20 fresh flowerheads of the eldertree ( as above- you will find elder trees in blossom right now  ).
3 sliced lemons
1.2 kg sugar
1.8 litres of boiling water
50 g citric acid.
Note : This last one ( citric acid ) is very hard to get-and is used as a preservative for your cordial - I tried quite a few chemists and had no luck .Citric acid  also exists in citrus fruits ( and in fizzy vitamin C tablets )- so in the end I opted for 4 fizzy vitamin C tablets  !! A very healthy drink !!It works the same way.
 You will also need :
Three or four sterilised glass bottles with screw-tops .( You sterilise them by putting them in the dishwasher and to let it run, or wash them and then dry them in a 150 degrees Centigrade hot oven ).


How to make the cordial :
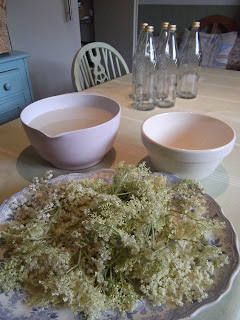
Pick your elderflowers and put them on a big dish .
                                                       The flowers are really pretty .
Boil the water, then pour it over the sugar in a big bowl, so the sugar dissolves. Put a plate or lid on the bowl and let it cool down a bit  for 15 to 20 minutes or so.
Shake the flowerheads over the sink so that eventual small insects that are on the flowers, fall off.
Take all the stalks off the flowerheads so you have a bowl full of flowers.
Slice your lemons, then take a big pan, and put the lemon slices and the flowers in the bottom and add the cooled down sugarwater .Add the citric acid- in my case 4 tablets of fizzy vitamin C tablets which have citric acid ( this does really work ! ).
                                                                                    
Cover with a lid or plate and let it stand for 24 hours.Then, get you labels ready for your bottles.I made a label which you can print off , which is here below- it will work as a label if you print it off as a photograph in colour on plain paper ..                                      
Take a clean tea-towel and tie it over a big bowl with string. Pour the elderflower-and-lemon  liquid over / in the tea-towel so it acts as a fine sieve and the clear liquid will drip in the bowl underneath. Throw the used flowers and lemon slices away.
To pour the cordial in your bottles without spilling, I can recommend dipping a milk-jug in the big bowl of elderflower cordial and then pour the cordial in there in the bottle. Paste or glue your labels on , put your surplus cordial bottles in the fridge and crack open your first self made elderflower cordial .

           Serve with ice-cubes , fizzy water ( dilute to taste ) and a sprig of mint if you have it handy.                                                                   
                                           
                                                                                    
                                                  Enjoy your own elderflower cordial!
                                                                               
                                                                Happy weekend!
 

I am linking this post to : 
( you will find the link and button at the end of my blog   )

craft Catwalk, Foodie Friday,Inspiration friday, Weekend wrap-up party, Saturday Spotlight,Metamorphosis Monday, Brag Monday, Craft-o-maniac- Monday, Masterpiece Monday,Making the world cuter Monday, Show off your cottage Monday, Made with love Monday.    


Tuesday, 24 May 2011

A Nautical Box- what to do with a shadow box frame

I dedicate this post about shadow-boxes , what to do with a shadow box frame and nautical decor, and nautical decorations,  to my inspiration, Bri with her funny and fab blog Me, you and a wiener.
She has just about the funniest post about a shadow-box with a sea fan here, you really must read it - it's hilarious and on top of that, she makes one heck of a nice box !!!
Her post reminded me I still had one of those boxes lurking in a corner and no idea what to do with it.
           It was previously owned by a famous spoon man.Here's the spoonman's spoon box.
                                   It's the only explanation I can come up with for the rails.
            I normally use my spoons and don't hang them on the wall .Not sure if I ever would.
I was pretty stumped what to do with this box .Thankfully I read Bri's post so the whole sea-and-nautical idea then dawned on me.
The wooden rails had to go, though, that was a given.The back came off too, with inside some faded velours .
                              
I was just too impatient to spray-paint the inside and outside of the box .Plus it was a really tight fit. It would not have closed properly  if you would only have even1 inch too much paint on the box.
                                                  Now for the inside....
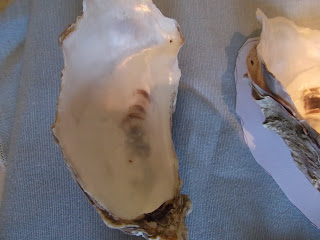
I still had a whole stash of oyster shells- from the time we had this some time ago.

I had washed and cleaned the shells and stored them- and they were in my garage with all the other stuff         " that may come in handy one day ".
Do you have a garage like mine - by the way ?? I daren't let one of my cats in there, as he a recluse and extremely good at hiding. There is so much stuff,( waiting for " make-overs" or just because " it might come in handy"  he once stayed there for months and you couldn't find him .
                He came out eventually though- when he wanted ( Cats! ) !( Yes- he was fed ! )
  I also had tons of leftover fabrics ...and pale blue seemed to go best with the oyster shells. So I had a look if  the oyster shells fitted in the box- as mine was very shallow .
                           The door of the box closed OK- so we were in business.
        I wrapped the fabric around the backpanel and  glue-gunned it ( at the back )  so it was stuck on.
  Did a paper pattern of the shells - to see where it would look best to glue them on. See the shell to the right.                                  You need to have a bit of a visual idea so the paper helps.
   Once I had decided, what looked best, I glue-gunned three rows of three oyster shells inside the box.
    To get rid of the wood- I glue-gunned a striped ribbon I had with the same colours on the outside.
     I made a cockade, topped with a mother of pearl button, and glue-gunned that at the top of the box..
                                                       Here you can see the whole thing.
                                                                  
                                                                    But I liked it best here .
                                                                          Here's  more of a detail.
                                                                       And more detail.
                                                                 Stop!Enough pictures!
                                        I suppose you can tell Iam pretty pleased with my box.
                                           Also this was not really my idea but Bri's- sort of.
                                                                    Thanks Bri!
                       Get yourself some shells, a box and a glue- gun and you're ready to roll-
                                               make your own nautical decor !!
                                                                   Happy crafting !

This project was featured by Rebecca Restrepo on www.examiner.com under National/Home & Living /Hobbies  here.


Monday, 16 May 2011

A festive floral fireplace


If you are lucky enought to have a garden, are thinking of a way to make a decoration floral  and are growing some climbers, like clematis, or Wisteria ,  why not enjoy nature indoors and make a lovely and festive , summery fireplace garland ?
Surely, a festive fireplace is not only for Christmas! Let's have some festiveness in the summer as well !!! You can use the following idea for floral decorations in general, or for flowers on a table or when you are stuck  and wondering how to create flower arrangements.
If you don't have a Clematis Montana at the moment , you can use the idea also with other climbers  -  ivy    combine with big bunches of cow-parsley ( all for free along the side of the road- ) for a lovely rustic summery effect- or climbing roses.
By the by, can I recommend to plant a Clematis Montana  ? You will soon have  long trails of tendrils and flowers to spare for any decoration you would like to put your hand to in the near future. 

Here you see how big Clematis Montana can become- you really won't miss a few tendrils !
Just cut some long lenghts of festoons of flowers- wrap the ends to keep them fresh in
wet tissue paper, then in aluminium foil like below- and your strings of flowers are ready to be used.
                                                 
 And you can start with the decorating ! I used both Clematis Montana AND Wisteria, as the pink and the mauve of these two climbers were both echoed in the painting above the fireplace..so look for what colours you have in your painting or mirror and fireplace you want to decorate, and try to find a climber that will compliment it colour-wise.
                                                    
 Here you can see a detail of the fireplace-mantel- on which I had also draped some Wisteria tendrils which were kept fresh in some £1,- " Souvenir from Margate" Victorian kitsch-y vases I picked up from a charity shop.( The inscriptions I turned to the wall and the back of the vase is quite refreshingly white and super- sweet .)
And here is a side- detail with the clematis tendrils. Just manoeuvre the end of the tendrils behind the picture or mirror around which you wrap the flower garland.
You can use some of the tendrils of Clematis Montana to decorate some moss topiary pots to tie it all together and get more height in the display, together with some candelabras.....
 How you make these topiary moss- pots, you can read in this post by the way .
         ( I will do a later post about how to make the clematis- moss- pots).
Here you can see the wildness and rusticity of the display a bit better- although sadly, there is a bit of flash .
                                                                                                                              
Give it a go- it's great fun- and it will cheer you up to end to look at something so festive- and all for practically nothing!!
                                                              Happy ( floral ) decorating !!
                             I hope I have given you some ideas how to create flower arrangements!


Friday, 6 May 2011

Wisteria wreathy loveliness

If you have a garden , thinking  " door  wreaths " and you have a bit of patience( we're talking 7 years or so ! )  , can I recommend you plant a wisteria  ? The lovely mauve drooping clusters of flowers  don't last too long, but when they come out, you can play around with it to your heart's content and they are super decorative and wonderfully scented- think Art Nouveau and Victorian ladies reclining on a chaise longue, their pretty heads encircled with a wreath of Wisteria flowers..
Just whack it in, water and feed it well, and let 7 years go by( yes, I know, that is the hard bit ! ) 
Wisteria, once it gets going can be a bit of a monster so make sure it does not creep it's way underneath your roof panes by the way !The occasional pruning should keep it in check.
Once you prune, you have some flowers left over..
                 which should give you a nice bit of material for a decorative wreath.
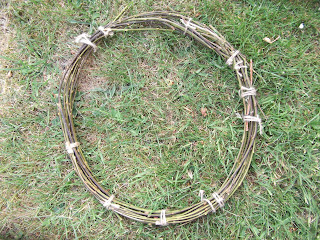
Make a basic wreath from willow, which you can find easily in the countryside or even in the city.
How to make the wreath is very easy, and is explained more extensively in this post- it's basically forming a large circle with several willow branches, then tying it with twine.
 To keep your flowers alive, use some tissue or lavatory paper which you moisten, and wrap the ends of the wisteria in this, then wrap some aluminium foil around this.
Your tools are thus  as follows:
As the flowers of the Wisteria are like vertical clusters, I thought it worked best if you attach the major part of the flowergroup at the top of the wreath so the wisteria can flow down from the top to the bottom.
The bottom of the wreath would look a bit strange with again drooping clusters hanging from it so I decided for the bottom part of the wreath to go for a string of Clematis Montana .Luckily , I have inherited a Mount Everest of Clematis Montana from the lady who owned the garden before me and planted this very kindly-and they can grow to an enormeous height..
                                                  ( Think two stories high at least - bit scary really ).
So plant yourself a clematis montana as well by the way- they give you such a lovely early Spring display.The flowers are very scented and from my mountain high clematis towering over my head the soft smell of old-fashioned 1950's facepowder seems to hang every night in the evening air, as thought Doris Day has just passed by on a sneaky nightly visit. If you don't have a clematis montana  beg , steal ot borrow a cutting or in the worst case scenario just buy yourself one( they's are not that expensive, maybe £6.95 or so )..   Again this may need pruning ! So here you have your clematis tendrils with flowers and all,  all nicely kept moist so it will last a few days with loo-paper and aluminium foil.                      
  Just attach to wreath at the bottom.( tuck the ends with aluminium foil away, out of sigh at the back. )
                                                Add pretty ribbon ( I went for cream ).
                                                                       Done ! 
                                                             You can hang it on the door ..
                                                                  

                                                                  and detail of the bottom :
                                                        
Or if you want to be careful with the delicate blooms of the Wisteria, and not have them moved to and fro when you open the door, you can hang the wreath inside...
                 This is a bit of a wild wreath with the clematis sticking out a bit but it gives a nice rustic feel.
I hope I have convinced you Wisteria is the way to go and you will get cracking with either planting the darned thing and smoke a pipe or cheroot or take up knitting for 7 years till the thing starts flowering, or IF you have one, to start making a wreath and enjoy the fabulous flowers not only outside but only inside !!!!                               Either way- enjoy planting  and/ or wreath making - wether it is a door wreath or simply a wreath for  an indoor floral decoration
                                                         And have a fabulous weekend!                     


Monday, 2 May 2011

Decorative Spring Table


Today I just wanted to show you how to make a decorative nest which you can use for displays for Spring table settings  and displays all year round.
First, take some material from nature from which you can wind a wreath (it still needs to be a bit spring-y and flexible ) - this could be old clematis- shoots, or dried sweet peas from last year .
Just have a look around to see what you can find, either in your garden or on a field trip or walk.
The material needs to be flexible and not break .I used old sweet peas .
 I also got some very thin  willow wisps to thread around it and some moss for the filling of the nest.
So this was my main material.


 Take a handful or two of the stringy material, either clematis or old sweet peas, stretch it out so you have a long  sort of string a hand wide and  start turning it into a circle, as though you are making a wreath. Cup the bottom together with your hands and pad and make into a bowl. Use some willow strips to weave through it so you fasten it to itself.  Make a slightly bigger wreath on top and a circlet of willow at the top.
Leave the willow sticking out here and there to get a rustic feel. Fill the bottom of your nest with moss.
Now for your eggs.
Take a big darning needle, make a big hole at the top and the bottom of your egg,

and blow out the egg yolk and egg white-
- and don't forget to collect the egg in a bowl so you can use it afterwards.
I usually get some feline assistance with the disposal of the egg yolks at this part of the proceedings !!
                                                             
                                                                          
Clean the eggs and dry them ( more extensive instructions if you need them are in this post, (  Easter egg  display with painted eggs ) then paint the eggs pale blue .
 I had some “ Theresa’s Green “ paint over from Farrow and Ball, from my plate rack make-over post  - and this was a perfect  pale blue.
To be  able to paint the egg all over, so that you do not have to hold it, you can  take a wooden skewer which you can get in a kitchen shop or supermarket, normally used for barbecueing, and skewer the egg on it, sticking the skewer in through the bottom hole you made, and fixing it in the top hole in the egg.
Paint the egg all over, turning it on the skewer, than fix the skewer while the paint dries in a surface that will support the skewer and egg.I could not think of anything clever so put it in a big candle.

You get no marks or fingerprints on the egg this way and it can dry all over. Once the egg is dry, it is time to paint the little speckles on it.
Take a saucer, a brush, some dark brown oil paint and some  non-smelling oil paint thinner.
                                   
     Thin the paint with the oil-paint thinner- it should be thin enough so you can spatter with it, but no so thin that the spattering will be too pale.You will just have to experiment a bit and do a trial- run of spattering on paper like I did here..
        Then spatter your egg- just take a hoghair brush, put the ends in the thinned oil paint, and run your thumb carefully over the brush, pointing in the direction of the egg.
 Your egg should end up like this:
   Make yourself a couple more eggs like this, place them in your newly made nest from clematis and willow...
                                                                                                                                                                                                               Add a gingham ribbon if you like..and you are done!
You can use this as a nice Spring Table Display in whatever way you like..quite simple, with some silver candelabra's and Spring flowers-
                                               or with a painting that echoes the eggs and the nest ...
                                             or just with some silver and crystal decanters..
 Whatever you decide, it will be quite a fun project -will just look lovely and will give that special Spring feeling in your house!
So enjoy the Spring time and your Spring crafting!!