This is a really lovely and rustic Christmas wreath you can make at practically no costs, as the basic material that is used is cardboard- in fact, old cardboard catfood boxes !
I was inspired by a frosty leaf I found one morning.Such a pity you can't keep the leaves as they are. When you carry them indoors, the leaf obviously thaws out and the pretty frost disappears.
Below the photograph I took of the leaf- I then traced it with permanent marker on an acrylic sheet and cut out the veins on the leaf with a craft knife so I had a stencil for the frosty bits.I also cut a stencil of the contour, so I could trace the leaves on my basic material.
This is the materail I had- loads and loads of empty cardboard boxes.
I cut the sides so it folded flat.
I then took the acrylic contour of the leaf and put it on the cardboard and traced it .I made 9 leaves this way.
I then cut them out with a craft knife.
Next were the veins on the leaves.I used some white acrylic paint and a flat tipped brush to tap the paint gently through.


This is what it should look like.
Then , I added some frost.. by spattering the white paint.You will need a saucer of the same white acrylic paint, but diluted till it's of about the consistency of milk.You will need to use a hog hair brush with long hairs on it.Try a few spatters on a newspaper first, as you need to have quite thin drops.Practice makes perfect!

This is what you should be getting...

.Continue with making the rest of the leaves.This is what it will look when the leaves are grouped together.

Then I made a wreath to put the leaves on.
I wanted to make a rustic wreath of tree branches, but then also made of cardboard.I drew some twig shapes on the cardboard and cut them out with a craft knife.

I then put the twiggy wreath together to see what it looked like without attaching the twigs to each other.

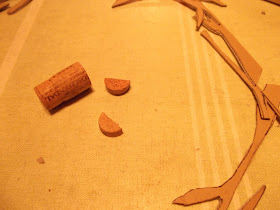
It would have been a very flat wreath if I would just have hotglued this together so I decided to give the wreath some depth.I used some cork from which I cut off slices, which I glued in between the layers of the twigs- and make it more three-dimensional.

Usually you see this done on three dimensional cards, where they use white foam to build the card up and give it more depth.

This was the twig wreath once it was done.

I then added the leaves and hotglued them on.I stuck them on in group of three, where two were underneath the wreath, and 1 leaf on top of the group, to make it look more realistic.

I wanted a Christmas feel to the wreath, so decided to add a reindeer.
I used this picture as an inspiration - just Google " Images-Reindeer Profiles"( and make sure it is not in copyright! ).

I used some scissors to cut the head off and position if as thought the reindeer was looking more upward, then cut the whole shape out and traced that on white card- then glued the card on the wreath on the inside- added a half-circle of cardbaord at the bottom for a bit more solidity and support to the whole thing, and ..done!

Rustic and seasonal at practically no cost!
Have a go, it's great fun!
Have a great rest of the week!
XOXO
Bea
linking this to
Fancy this Fridays
Feathered Nest Friday
Inspiration Friday
Show and tell Friday
Metamorphosis Monday


No comments:
Post a Comment
Thank you so much for taking the time to leave me a comment! Please note** I never publish anonymous or name-less comments** and I reserve the right to restrict comments that are mean-spirited, contain profanity or personal attacks, or intend merely to promote a personal or unrelated business.Thank you!