Pages

Friday, 30 September 2011

Art , books and dogs

Art, books and dogs, that would just about sum me up.
I was inspired today by Naomi from DesignManifest -her latest post is about a wall of shelves and art .
So I thought to show you around a bit at Modern Country Lady- the pad :-)
Here is one of the walls in my living room - mainly dog paintings,and prints.
The oil painting with the black and white dog is of my fabulous and much missed dog Harris.

This is me with Harris two years ago.He was fifteen at the time and started to get tired easily on walks.. such a lovely adorable doglet.


Then there are shelves full of books about design , art and craft, and thrillers :)- just in case you're bored ..

This cherub lamp was thrown away so I rewired it , repaired the right hand side of the face with Polyfiller and gave it a new coat of paint and a new shade.
That papier mache book is there to remind me I want to do a whole load of exciting projects with it. Everything is possible with papier mache, did you know? It becomes rock hard like wood- and you can even make furniture with it..
And the lamp gives that bit of extra light.

Then to the right of the wall with dog paintings is the fire place.
I love clocks but my French clock does not fit on this fireplace so it's in my work room..
This clock is not as pretty but has a Westminster chime ( like Big Ben ).

In front of the fireplace is an ottoman.A bit of a tricky beast as the two right legs are loose .Definitely on my list to do is to glue two dratted things back with " No more nails" - one day ..
Here is the temperamental ottoman from the front.I usually don't do candles but this is when we first had bough the ottoman and were still very much in love with it.Little did we know about the loose legs and the temperament at that time!

Then in front of the ottoman is the sofa.This is usually taken over by dogs.

And at the end of the room is my desk .. with a statue that wears my gardening hat.
I usually check up on emails and the blog from here ..
And to the right of the statue is my lucky frog- who is now on my desk as my dogs kept on trying to eat him :-)
Hope you enjoyed your tour.. I'm off to enjoy the fabulous weather..
There is a sunny bench in the garden calling my name :-)
Have a lovely weekend!
XOXO
Bea

linking to
weekend wrap up party
metamorphosis monday


Wednesday, 28 September 2011

Children's rooms and murals

Today I wanted to share a few projects of  of children's rooms and murals I have done in the past - just for fun .....

This yellow and blue children's room was designed by me and existed of a wallpaper design,  two different fabric designs for two baby duvet covers , a folding screen and a clock, all with similar motifs .This one was for the nursery for my best friend's daughter, Dorrit, in Holland.

If you don't know what the baby is going to be like it's sometimes easier to go for a colour that will leave this open !

Here in the UK , loads of people live in really super cute old cottages.. but the sloping ceilings make it impossible to hang anything on the wall.. and your only option is a mural for some decoration..
Here is one I did for a nursery ..

.. and here is another detail..the motif was taken from the fabric they had for the blinds..

Then, there was another sloping ceiling... this time for someone who was crazy about cherubs and blue-and-white....

The only disadvantage  of murals on sloping ceilings is for the painter, as painting half way up with your head in an angle gives you a terrible crick in the neck :-)

The really fabulous and best murals I have ever seen are the ones  in Italy, were you just see unbelievable work, all marble-ed walls, and incredible trompe l'oeils...
If you have never been you must go and have a look!!

I myself have only put the occasional bit upon my wall- this is in a previous house in a  bathroom with a very boring and bland expanse of wall space..

And here - this was not exactly a mural but it did give me a crick in the neck too, as I spent all day on my stomach painting this...( also a commission for a client a while back ) ..

..and here is a detail..

Yep- that was definitely a crick in the neck day !!
And some more sloping ceiling and some more cherubs.. I seem to have spent a lot of time painting them..
Not even very fond of the dratted things hahaha!!


Hope you have enjoyed your tour.. :-)
Have a great rest of the week!!
XOXO
Bea

linking to
 Show us your kids room

Wednesday, 21 September 2011

The cutest little cupboard in the world

If you want to read a story about how good things come to those who wait , I will let you in on the story of my new cupboard.
This cupboard  was disliked by everyone for it's sheer utter drabness and lived in the garage for five years.
This is the before .
But this week, surrounded by cardboard boxes holding " stuff" ,chairs full of heaps of more "stuff" ,and loads of other "stuff" on the floor , in my workroom, I decided I needed a cupboard fast.
So I decided it was time for this cupboard to get back on board..
After all, it had two drawers, and three shelves, so all it needed was a little bit of cuteness.
I first painted it Cooking Apple Green from Farrow and Ball ( mainly because I have tons left from this ).
Then I raided the garage again and unscrewed a bit of lovely woodcarving from a single bed headboard which I had picked up from a charity shop.I glued this (with " No More Nails !" - rockhard  ) on the top of the cupboard, then painted it Cooking Apple Green as well.
That made me feel a bit better about the cupboard and I am sure the cupboard felt better about itself as well...

Then I cleaned the inside and covered the whole inside , shelves and drawers with black and white ticking.
( Zero cost as this was a bit of a leftover.-Ikea.).
I was too mean to spend a penny on fancy ironmongery , so I made some nice bows with ribbons , sewed some buttons on top of the bow, and hot-glued them inside the existing handles.Piece of cake!

The door handles..
and..drawer-handles: ..
Then it still looked a bit like it lacked some interest..
So I thought to add some roses..
Just go on Google-Images-Victorian scraps like here.
Then print off the ones you like, in colour and use them for decoupage , and glue them on.
I tried to echo the curved shape of the woodcarving on the top.
The bottom drawers I did like this :
And now I have some great additional cupboard space.. which is a real pleasure to look at..

Not only is it one of the cutest little cupboards I have ever had...

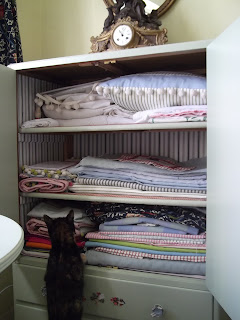
.. and does it give me loads of storage space...I wonder if any of you have noticed Tilda - trying to check the cupboard out..a tiny face and two big ears here above....:-)
but apparently...
.. it's also the most comfortable cupboard in the world , hahaha!
Have a great rest of the week!
XOXO
Bea

linking to
frugalicious friday
furniture friday
wow us wednesdays
whatever goes wednesday
penny pinching party
show and tell
sizzle into summer
thrifty thursday
tabletop thursday
show and tell friday
home sweet home
vintage inspiration friday
potpourri friday
brag monday
 metamorphosis monday
mod mix monday
fall into fall
weekend wrap up party

Wednesday, 14 September 2011

Gift-basket tutorial.


This year, be prepared and get some giftbaskets done in advance - way ahead for Christmas.
This is a re-post from last year- but you wil really enjoy this project and it's the right time of year to get this done! So get going and enjoy!!

For your Christmas gift basket you will need:

 2 pots of home-made jam ( see ideas and recipes page ).

1 cardboard box ( an empty Whiskas 12-pouch catfood-carton will do just fine- an empty Felix- cardboard box  is OK, too, I am not partial .)


Two or three handfuls of  hay - you will find this in a petfood shop and /or a  country store , like  SCATS         http://www.scatscountrystores.co.uk
1 roll of brown packing paper - from the post-office or a stationary shop. 
1 Glue-stick.
1 Pretty ribbon( about 2 meters long )  from for instance : East of India-see:  http://www.eden247.co.uk/ribbon-merry-christmas.ir?cName=east-of-india-gifts-home-ribbons-by-east-of-india

How to make the basket:
Lower the height of the cardboard-box by cutting the top 7 or 10 centimeters off with scissors.
Roll out about 1 meter of the brown paper - cut this off, and put the cardboard box on it, so the paper forms a lozenge under the box- see below.
Spread glue with the glue-stick on the 4 sides of the card-board box and press the brown paper against the glued sides.To do this, hold one hand within the cardboard box, and with the other hand press the brown paper hard against the outside of the box so it sticks to the glue and the cardboard.The paper will stand up in peaks  - if it is too high, cut it off a bit.
Put some hay on the bottom of the box. Put both pots with jam in the card-board box , and put them both in at an angle, one pot to the left, one to the right.
Fill the rest of the space in the box with the hay so the jam-pots can not  move about and are wedged tight.
Fold the brown paper back a bit like below.


If it comes away from the cardboard, use a bit more glue and pressure to secure it to the cardboard box.
Secure a ribbon all around the middle of the cardboard box so it sits between the pot of jam to the right and the pot of jam to the left.
Knot a pretty bow on the front of the gift basket.That's it! You're done!!


Congratulate yourself and have a stiff drink or a cup of tea- or whatever you may fancy.
Have a great rest of the week!!
XOXO
Bea


linking to
Tablescape Thursday
feathered nest friday
Sunday, 11 September 2011

Architectural salvage

If having a Palladian villa or an architectural masterpiece by Inigo Jones is not an option.... but you want to treat yourself or your friends to the illusion of the real thing, just have a look on  http://www.panteek.com/index.htm
Then go to : Vitruvius Britannicus Architectural Prints 1715

and create your own fabulous gift wrapping.

It has architectural drawings galore and lots of other stuff .
I have some architectural prints that I made myself, which hang in the study..like this one..
with a detail here..
But to be honest, you really can't have enough of a good thing !
To get yourself some fabulous gift wrapping, print off some architectural prints in colour ( it will give you a nice old fashioned yellow/ green print  like an old faded drawing )  and you are ready to roll and to get going with your wrapping.
I was on a business-course/ workshop for three days this week and my lovely neighbour had kindly looked after my doggies, so I wanted to give her a nice thank-you present and decided on some self made plums in wodka....
Next you need a small cardboard box, and some bubble wrap..cat-food boxes are usually pretty good..
then pack the jar in the box like so....
.then make sure the box is all sello-taped up, and place it on the first architectural drawing sheet you want to use .Make sure that the architectural drawing fits the box and the drawing itself creates a " front" on the box..
Here you will see what I mean- you want to aim to get the front like this..

Next, fold it up neatly at the corners..
And on the rectangle that you get to the side, cut an floor-plan from one of your copies of drawings and glue it on ...

.. and do the same with the other side as well.
Then, use a nice ribbon..like this one from East of India ( you can buy them here ) for instance..

Then wrap it round the box and do up in a bow..this is the top of the present..
I added a small bunch of dried lavender ( own garden) ..
and wrap this in some cellophane ..

.. and add it to the box in your giftbag
I had another thing to wrap, as my neighbour is an real Agatha Christie affectionado ..
and this was also wrapped in an architectural drawing....which made it look like this...
Overall,pretty simple and great fun- so give it a go !!!

Happy crafting and have  great weekend!!
XOXO
Bea